
Introduction
Changing the battery in your Oculus Quest 2 controller may seem daunting, but it’s a quick and simple process. In this guide, I’ll walk you through the steps to replace the battery efficiently. Whether you’re new to VR or a seasoned pro, this guide will help you keep your controllers powered up.
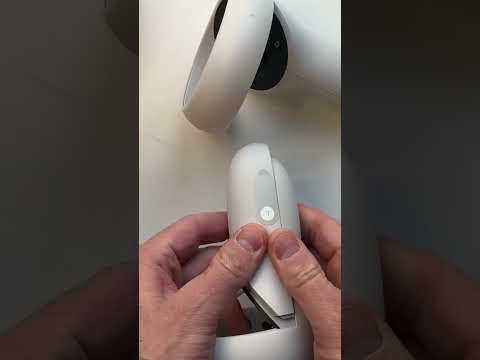
Locating the Battery Compartment
The battery compartment is on the opposite side of the trigger. To access it, follow these steps:
- Hold the controller with the trigger facing you.
- Locate the battery compartment cover on the back.
- Push down on the cover to open it.
Make sure to push away from the circular part of the cover to reveal the battery inside.
Removing the Old Battery
Once the compartment is open, you’ll see a single AA battery. The positive side of the battery should be facing away from the circle. To remove the battery:
- Apply pressure towards the circle.
- Use a non-metal tool like a library card or credit card.
- Insert the card and pull it towards you.
This technique gives you the leverage needed to pop out the old battery.
Inserting the New Battery
After removing the old battery, it’s time to insert the new one. Here’s how:
- Ensure the positive side faces away from the circle.
- Push the battery into the compartment.
- Make sure it is securely in place.
Once the new battery is in, close the cover by pushing it back into place.
Tips for Longer Battery Life
To maximize your controller’s battery life, consider these tips:
- Avoid extreme temperatures.
- Turn off controllers when not in use.
- Use high-quality batteries.
Following these tips can help you get more playtime between battery changes.
Using High-Quality Batteries
Investing in high-quality batteries can make a significant difference. I recommend lithium AA batteries for their long-lasting power. You can find reliable options here.
Common Mistakes to Avoid
When changing the battery, avoid these common mistakes:
- Using metal tools.
- Forcing the cover open.
- Inserting the battery incorrectly.
These mistakes can damage your controller or reduce battery life.
FAQs
How often should I change the battery?
The frequency depends on usage. Heavy users may need to change it monthly, while casual users might change it every few months.
Can I use rechargeable batteries?
Yes, rechargeable batteries are an eco-friendly option. Ensure they are compatible with your controller.
What should I do if the new battery doesn’t work?
Check the battery orientation and ensure it’s fully charged. If it still doesn’t work, try a different battery.
Is it safe to use third-party batteries?
Using third-party batteries is generally safe if they meet quality standards. However, always check reviews and ratings before purchasing.
Conclusion
Changing the battery in your Oculus Quest 2 controller is a quick and straightforward process. By following the steps outlined above, you can ensure your controllers are always ready for action. Remember to use high-quality batteries and follow best practices for battery care. Happy gaming!
Additional Resources
For more tips and tricks on maintaining your VR equipment, check out our other guides. Stay updated with the latest VR news and tutorials by subscribing to our newsletter.