
Replacing the battery in your Volvo XC60 key fob is a simple task that you can do at home. This guide will walk you through each step of the process, ensuring that your key fob is back in working order in no time. All you’ll need is a flathead screwdriver and a CR2430 battery.

- 3V, 280mAH, 2 pack
- D:24.5mm, H:3.0mm
Gather Your Tools and Materials
Before you begin, make sure you have everything you need. The tools and materials required for this task are minimal:
- Flathead screwdriver
- CR2430 battery
The CR2430 battery is inexpensive and can be found online. You can purchase it from various retailers, including Amazon.
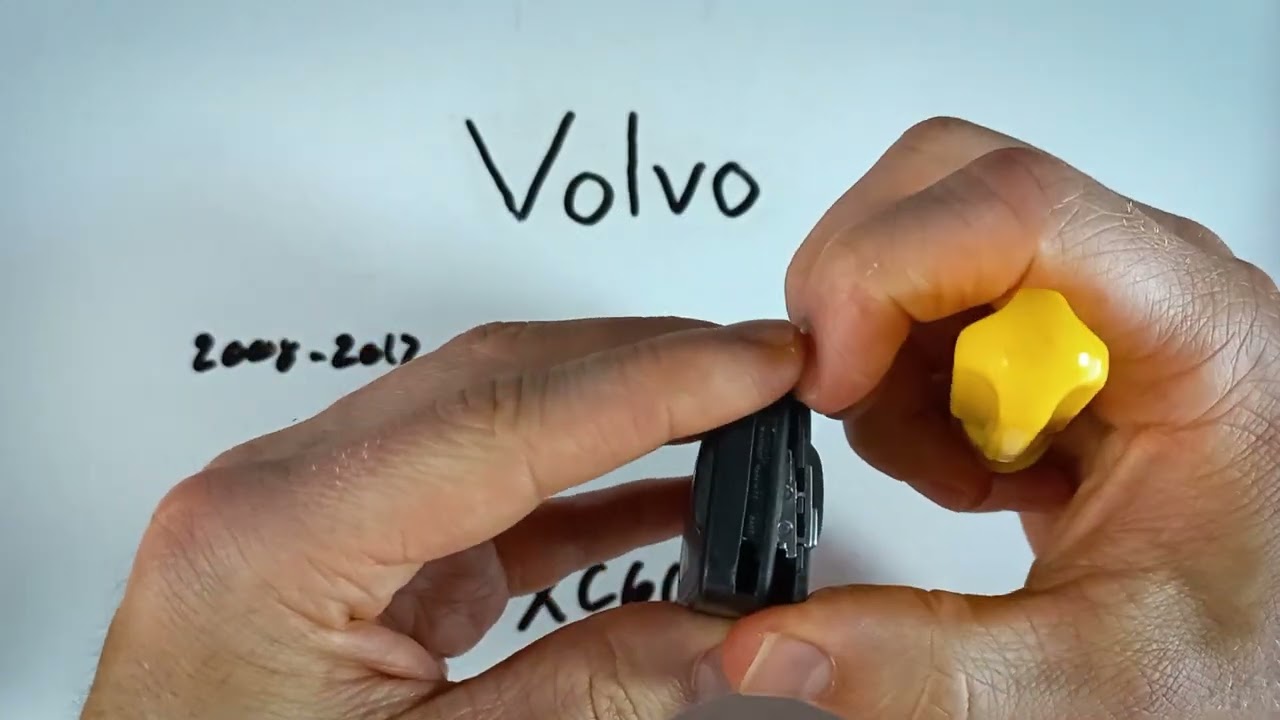
Remove the Internal Key
To start, locate the switch on the back of the key fob at the bottom. This switch holds the internal key in place. Follow these steps:
- Press down on the switch.
- Pull out the internal key.
It’s worth noting that there are two versions of the key fob: a six-button version and a five-button version. Regardless of which one you have, the process for replacing the battery is the same.
Open the Key Fob
With the internal key removed, it’s time to open the key fob. You’ll use your flathead screwdriver for this part:
- Insert the flathead screwdriver into the keyhole.
- Find the sweet spot and apply gentle pressure.
- Push until the back section of plastic starts to come off.
- Create enough space in the corner to fit your flathead screwdriver.
- Pry the back off carefully.
Be cautious not to apply too much pressure, as this can damage the plastic. If you prefer, you can also use the internal key to find the sweet spot and pry the back off. However, using the flathead screwdriver is often easier.
Remove the Old Battery
Now that the key fob is open, you have access to the battery. Follow these steps to remove the old battery:
- Continue using the flathead screwdriver.
- Insert it into the top corner of the battery compartment.
- Pry the battery out carefully.
At this point, you’re ready to replace the old battery with a new one.
Insert the New Battery
When inserting the new CR2430 battery, make sure the positive side (marked with a plus sign) is facing down. Here’s how to do it:
- Place the new battery into the compartment.
- Ensure the positive side is facing down.
- Click the battery into place.
It’s important to ensure the battery is securely in place to avoid any issues with your key fob’s functionality.
Reassemble the Key Fob
With the new battery installed, it’s time to put the key fob back together. Follow these steps:
- Place the star-shaped metal component on top of the battery.
- Snap the back cover into place.
- Reinsert the internal key.
Make sure everything is securely in place before testing your key fob.
Test Your Key Fob
Now that your key fob is reassembled, test it to ensure it’s working correctly. Press the buttons to see if they respond as expected. If everything is functioning properly, you’ve successfully replaced the battery in your Volvo XC60 key fob.
- 3V, 280mAH, 2 pack
- D:24.5mm, H:3.0mm
Frequently Asked Questions
What tools do I need to replace the battery?
You’ll need a flathead screwdriver and a CR2430 battery.
Does it matter if I have a six-button or five-button key fob?
No, the process is the same for both versions.
How do I remove the internal key?
Press down on the switch at the bottom of the key fob and pull out the internal key.
How do I avoid damaging the plastic when opening the key fob?
Apply gentle pressure with the flathead screwdriver and avoid using excessive force.
Which side of the new battery should face down?
The positive side, marked with a plus sign, should face down.
Where can I buy a CR2430 battery?
You can purchase a CR2430 battery online from retailers like Amazon.
- 3V, 280mAH, 2 pack
- D:24.5mm, H:3.0mm
What should I do if my key fob isn’t working after replacing the battery?
Ensure the battery is correctly installed and securely in place. If it still doesn’t work, consider consulting a professional.
Replacing the battery in your Volvo XC60 key fob is a straightforward task that can save you time and money. By following this guide, you’ll have a fully functional key fob in just a few minutes. If you found this guide helpful, feel free to leave a comment or like. For more tutorials on key fob maintenance, be sure to visit our channel.